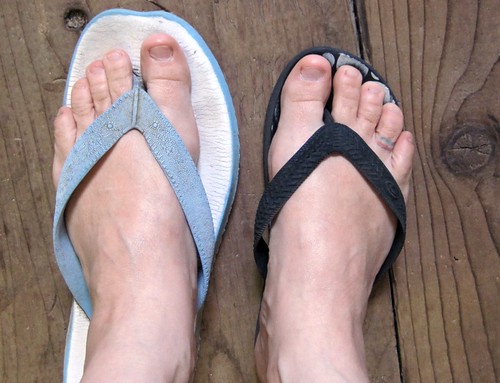
Somebody took my left thong and hid it. Somebody took DH's left thong and hid it too......thankfully I only had to wear this mismatched pair to the letterbox. Nobody saw me which was good. But then everyone around here knows I'm a bit quirky so they probably would have just assumed I was trying out a new look and then I would have tried to explain, which would have made it worse because I get flustered when I'm embarrassed and trying to defend myself. And then they REALLY would have thought I'd chosen to wear odd thongs.
Now that I look at my feet I can see how badly I need to let my toe nails grow. I cut them super short for some reason and I need to stop it. Painted nails would be so much cuter.
And yes, that is a tattoo on my toe. It was a failed attempt and there's a funny story about it, but you'd have to buy me a tequila to get me to tell it ;)
Monday, November 14, 2011
Thongs
Wednesday, November 2, 2011
White Ants

Apparently, if you're a white ant, after you've eaten the insides of the built in pine tv unit, the skirtings and the architraves, books made a rather tasty dessert.
If I'd taken a picture of this book yesterday I'd have been able to show you the dozens of white ants happily eating away at it's pages, but I put the book outside overnight and when I went to take the picture the next day they were all gone. Because, apparently if you're a black ant, white ants are rather tasty.
Saturday, October 22, 2011
And more undies!
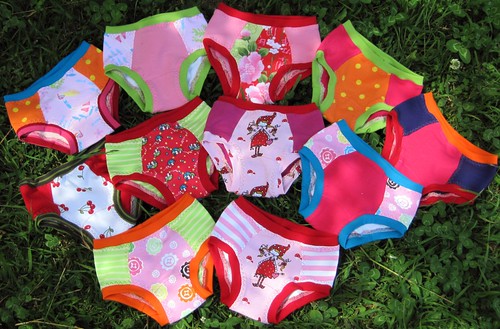
It's been a really, really long time since I've had paid work so I have been having a wonderful time making undies and selling them. 6 pairs of these were for an order from a truly lovely lady who does the MOST amazing sewing, so I was incredibly nervous making them for her little girl. I cut and sewed 6 pairs, then decided my colour combos weren't good enough so cut and sewed a whole bunch more!
Tuesday, October 4, 2011
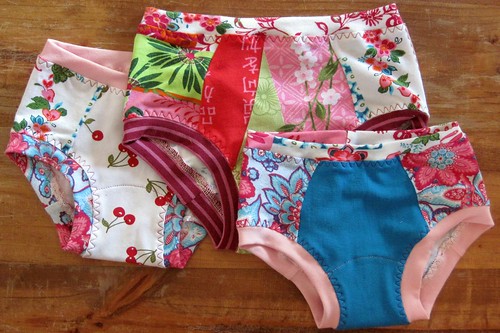
That Darn Kat knickers
It's been a long time since I last posted and very little sewing has been done, but I finally found some time to get back to the machines and I made some knickers.....just a little stress free sewing to help me get back in the groove and use up some smaller bits of fabric. Fun! :)
Sunday, July 17, 2011
And the winner is.......
And Lori, you're it :D
If you could please send me your details I'll send you some vintage magazine loveliness.
Tuesday, July 12, 2011
Ooshka babushka
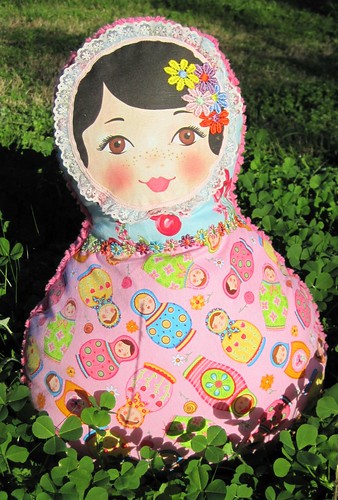
I couldn't help myself.....I kept seeing all these gorgeous Ooshka's being made in blogland and had to join in the fun!
The fabric choices were not my own. I would have picked a bunch of florals and personally I think it's a bit of Ooshka overkill but hey, beauty is in the eye of the beholder (and in this case the receiver). Besides, I am not the style police lol.
I did make a little alteration to the pattern and made this Ooshka a bit wider. I felt she needed to be a bit more cuddly and I'm happy with her width but next time I may make her longer too. I can't ever seem to make anything without altering it in some way. I've tried, but it's no good. I can't help myself.
I had to add the lace that frames her face as the face panel was fraying something terrible and I could see it would come off eventually. I also had to add the flowers as someone took to dollies face with a biro.....but all is well as the flowers add a cute touch.
Sunday, July 10, 2011
A giveaway
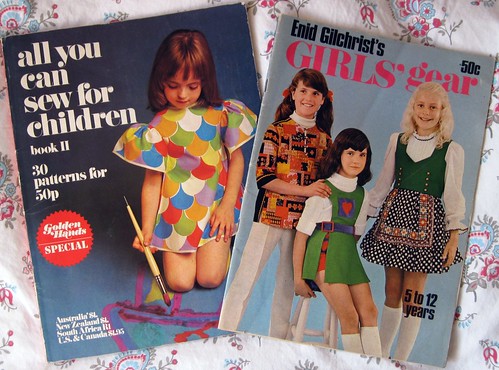
Earlier this year I said I wanted my aim for the year to be more giving and I have been able to achieve that in my real life but I have neglected my bloggy life, so when my MIL arrived with a bag of books for me and I found these two in it, which I already own, I knew I wanted to have another giveaway :)
Both of these books are lovely and full or all sorts of retro cuteness, so I hope someone will love them and get some use out of them.
To enter please leave me a comment. No need to be a follower, no need to post on your own blog. No need to stand on your head an sing the national anthem either ;)
Sigh.....I do struggle with this photo uploading thing. I forgot to select the correct size for the blog and now part of the photo is cropped and I'm having a hard time working out how to go back and fix it lol, so just to let you know the Enid is for sizes 5 to 12 years.
Edited to add that I'll draw this on Sunday :)
Sweet and simple
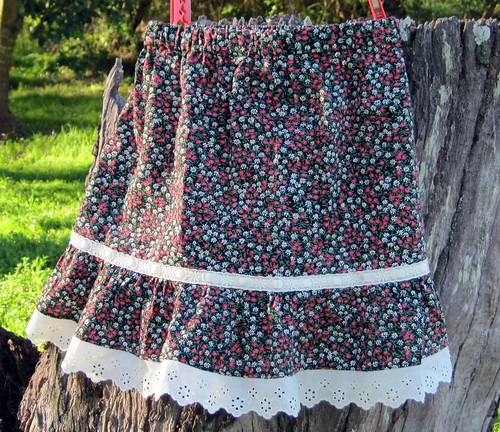
This was one of those easy little projects that was just a joy to create. No pattern required. All fabric and trims from stash. What's not to love?
Should there be anyone wishing to make their own little skirt like this it's just a matter of...
1 - measure your little one around the hips, add 15cm and that is the width of the upper skirt. Measure from waist to knees, add 3cm for the waistband casing and 1cm for the seam where the upper skirt joins the lower skirt and that's your length.
2 - cut a ruffle strip however long you want it and twice the width of the upper skirt.
3 - overlock your chosen trim to the bottom strip of the skirt, press the seam up and topstitch it down. Gather the upper edge of this strip so that it is the same width as the upper skirt.
4 - sew the ruffled strip to the upper skirt, overlock and press the seam up toward the top of the skirt. Lay your trim over the seam and stitch down. My trim is a broderie insertion lace and I stitched that down first then threaded the ribbon through using a safetey pin......note to self must get a bodkin!!
5 - overlock the top of the skirt.
6 - sew up the side seams.
7 - turn down the waistband casing and stitch leaving a small opening for the elastic...then thread the elastic, sew up the ends and sew closed the opening (don't forget to try the skirt on before you close up the opening - I've been caught out that way a few times and had to unpick).
And that's it!!
Should anyone have any questions or if any of these steps are unclear please feel free to leave a comment and ask.
Tuesday, July 5, 2011
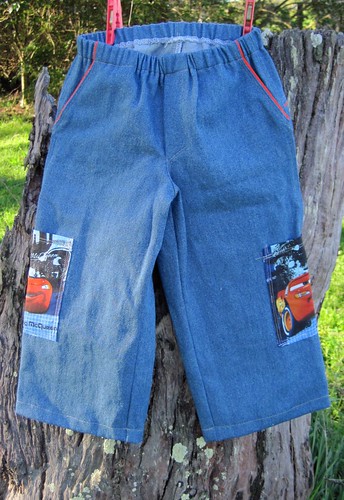
Kachow
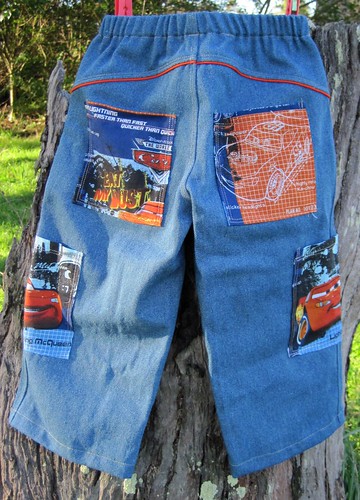
These are for a little Lightning McQueen fan :)
I used denim from stash and the cars print is from curtain fabric from Spotlight. I also added a little piping to the seams to break up the denim and add some interest. I used an Otto pattern and I have to say all the pieces went together like a dream.....
Vintage Curtains.
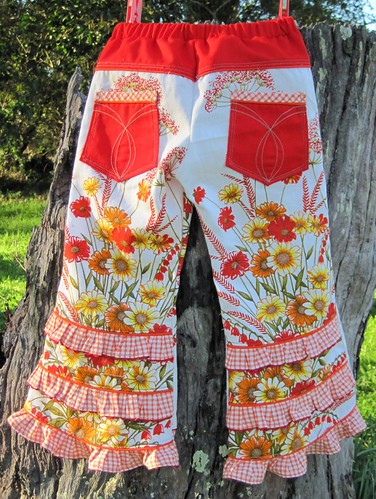
I found a set of kitchen curtains in the salvos a long time ago and fell in love with the bright print. Many months later I came across the orange gingham in the same store and suddenly realised what I wanted to make out of them.....Kim pants with the little frills on the back.
I'm very happy with how these turned out, though of course now that I look at them I realise they'd look so much better with a false fly or a zip fly (scary!!), some belt loops and the waist band in the white curtain fabric. There wasn't enough to do the waist band in the curtain fabric though as I was only just able to get the front of the pants out of them and for that I had to unpick the curtain hem and leave off the gathered section that the Kim pants usually have.
Tuesday, June 7, 2011
Stripes for Me.
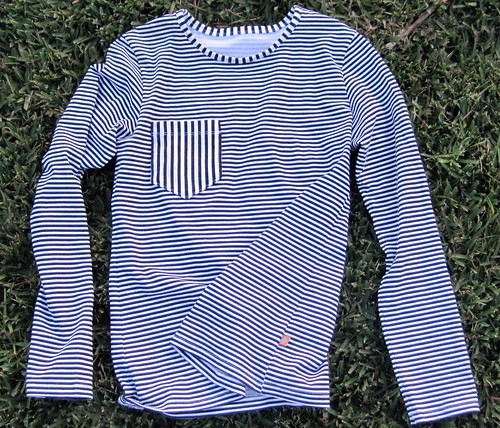
I bought a copy of Shop Til You Drop on impulse a few months back and saw a stripey top that I liked. I had a light bulb moment when I realised I had a piece of stripey knit fabric that had been sitting in my stash for at least 12 years. Then I had another moment when I realised that the patterns in the kids Ottobre mags go up to a size 170 in height.....
So here is my new top, size 170 Otto kids made from 12 year old stash fabric. It fits very well though it would probably be a bit more comfy if the fabric had a bit of elastane in it. Or if I wasn't a very late 30 something year old.....but we won't go there. I much prefer to blame the fabric ;)
The original in Shop Til You Drop was around $120.....so I'm happy. Well, I'd be happier if I had the money to buy the original if I wanted, but again, we won't go there!
I've been told it looks good on me but the stripes make your eyes feel funny lol.
Monday, June 6, 2011
Win.

So after a little unpicking which was surprisingly not very painful at all, I was able to finish my top. It fits well and I love the fabric, so it's a win. Phew :)
Saturday, May 21, 2011
Fail.


In my defense I was tired and distracted. That's all I have to say on the matter.
Guess I'll be having another date with the stitch unpicker.
Thursday, May 5, 2011
Can you see it?


I have a date with my unpicker.
It's not the greatest picture but if you look at the top row of chenille squares (yes.....it's chenille again lol) you'll see the pile is going in the wrong direction. Don't you hate that?
And I thought I was done with piecing this quilt top. Oh well........that's what happens when I sew when tired.
Wednesday, May 4, 2011
Lots of dunnyruggers.....and a cat


I promise after this I'll make something other than skirts or pants in chenille.........
The cat says "Hi" :)
Thursday, April 28, 2011
Dunnyruggers


The name has stuck. Pants made out of chenille are called 'Dunnyruggers'.
This pair has some pockets on the back made out of vintage sheets. I'd love to show them off but I still don't know how to upload 2 photos at a time which is very frustrating as I'd like to start doing some tutorials just to give a little back to the community and help anyone new to sewing.
I love sewing with chenille - especially when the fringing is still on the bottom. This fabric was given to me by another lovely sewist and blogger quite some time ago. Thank you Claire :)
Tuesday, April 12, 2011
Thinking outside the box

 I was looking at my 55 litre tub of UFO's the other day when inspiration struck. I had a few squares cut and sewn for this quilt, it's a truly scrappy quilt. The kind only mad people make and people who can't throw even the tiniest scrap in the bin (I fit both of those categories lol). Then I spotted the unfinished Feliz that I was making out of calico. Light bulb moment. I needed calico squares......I didn't want to finish that Feliz. Out came the rotary cutter and problem solved. Then I found another unfinished peasant style calico dress. It too was cut into squares.....yeah!! I won't go into a whole description of how this quilt is made as there are plenty of other people doing the same thing out there and they have far more experience and can offer much better advice than I can. I'm not a quilter at all, I just happen to like using up little bits of fabric. I just cut them into strips and stitched them over the calico squares. I wasn't sure that I liked the look at first and was going to turn it into a dollies quilt, but it's grown on me so I'm going to keep adding to it. Which is great cause I have an unfinished dress in that cute blue cherry print and my rotary cutter is itching to get stuck into it :D
 Monday, April 4, 2011
Slinky Laguna leggings

 Another couple of things out of the UFO tub! These are panne velvet leggings made using the Farbenmix Laguna pattern. Panne velvet makes such great leggings....it's stretchy, recovers well so there are no 'knees', it's warm, comfy, feels very "slinky" (so I'm told lol) and it looks really cute. Can you tell I like them? :D The only issue I have with the panne velvet is the waist elastic tends to roll over and over inside the casing, so to fix this I have stitched the elastic in 4 places......over the casing and through the elastic at the back, the front and at each side. I'm actually pretty happy with this method as one of my gripes about handmade is the loose elastic turning over inside the casings, but I have had no luck with overlocking the elastic in (as you see on store bought pants/skirts). I find the overlocking method permanently stretches the elastic so that the waists are then too big and it's such a pain to re-do. I think I'm going to do all my elastic waists using this method from now on. It makes for less fiddling later when the clothes are being washed and put away. I also found the Laguna leggings pattern was a bit generous so I didn't add seam allowance and this made them a bit more fitted.

 So this is not the most exciting creation ever but it is one thing out of the UFO tub. It's just a simple little nightie. I used some horse rib knit that I bought from the US. I know I should buy Australian but I have to be honest and say that the US knits are nicer than what I can buy here and even with the shipping it's a whole lot cheaper to buy from the States. I do have quite an enormous stash of fabric now so I shouldn't have to buy anything for quite some time. The pattern is a Kwik Sew nightie pattern that I picked up in an Op shop for 50 cents. Bargain! I can't remember the number but I can dig it out should anyone want to know. It's easy peasy and has become my go-to pattern for nighties.
Sunday, April 3, 2011
55 litres of UFO's

 So here it is..........this is my UFO tub......all 55 litres of it!! Now, if I'm going to be completely honest, there are more UFO's lurking about the place. There's the Burda skirt I started when I was 18 and couldn't finish as when I was 18 I wasn't as clever as I am now. Only trouble with that is I'm not as thin now as I was when I was 18. Still, I'll finish that skirt one day. That skirt reminds me of Uluru......when I was 16 I went on a school trip to Uluru and I was too scared to climb to the top. I felt like a failure. But I was terrified of heights and I just couldn't do it. So, when I was 26 I went back to Uluru. I had to conquer my fears and overcome my defeat....and I did it. I was still terrified and in sections I inched along on my bum (not a pretty sight and really embarrassing when the german tourists kept offering to help me lol) but I did it. I won. It was the greatest feeling. I'm nearing 40 now and it's been a very long time since I was 16 and terrified of being blown off the top of that great big rock. It's been a long time since I was terrified of all the pleats in that Burda skirt pattern too. It's been a long time since I went back and conquered Uluru. These days I have other things to worry about and as I approach 40 I'm thinking about how I don't want to carry the fears and failures of my past into the next half of my life. I want a new start, I don't want to procrastinate anymore. I want to be strong, happy, wise and loving. I want to follow my dreams and have no fear of failure. I want to have fun. I want to be the best version of myself that I can possibly be. So, this tub of UFO's has become the physical manifestation of my procrastination and it has to be completed. I also need to find that Burda skirt. I know it's here somewhere........and when I'm done I will feel like I've won. Like I'm ready to move forward and onto better things. I'm really looking forward to seeing the bottom of that tub!
Friday, March 18, 2011
Blue chenille pants
 I love chenille pants......these are baby sized and I have used a little fish print in a quilting cotton for the pockets. I also used the fish print to bind the hems. I am a little disappointed with my pocket placement...they're a little high up. I do wonder if there's some kind of formula for pocket placement or if it's just trial and error?
DH calls these dunny rug pants as he thinks chenille belongs on the toilet floor......men!!!
Monday, February 28, 2011
I have issues.
I love patterns.
I love designing.
Now this is all good.............but...........
I really don't like sewing.
It's not that I don't have a nice machine, I have two in fact. I'm a very lucky gal in that regard. It's just that the sewing part take so loooooonnnnnggggg!!!! And I have sooooo many ideas running around in my head. And sooooo many cut projects waiting to be sewn up. And sooooo many patterns screaming for attention. And soooooo much fabric calling 'pick me' 'pick me'.
It's a problem.
Now, if I were a rich girl I'd be able to pay someone to do my sewing while I cut and played with designs and fabric and patterns all day.
But I'm not rich. Sigh..........
So I have to get real and try to control my mind. But it's not easy. It's nearly impossible in fact.
Ah what the hell..........I'm off to play with my patterns and fabric and I'm not going to look anywhere near the 'to sew' pile neat my machine!
Which of course means I'll have no nice pretty pictures of finished things to show here for a while yet. Unless of course you want to see my UFO's lol.
Monday, January 31, 2011
The giveaway goes to.......
Since it's been so darned hot here I figured I'd let the fan do the work for me........I put all the little bits of paper on a plate and sat them in front of the fan and 'whoooooosh' off they all went! I figured the one that flew the furthest would be the winner and that was Handmade Handgrown who's name landed at a distance of 118cm's :) So could you please send me the address you would like me to post the pattern to?
Now I would have shown you a photo of my highly sophisticated setup, but alas my card reader is still in hiding.........
Thank you to everyone who entered and thank you also to those who've decided to follow my blog. I guess that means I'll actually have to do some posts now lol. But really, this has been fun and I hope to do it again soon.
Wednesday, January 26, 2011
A giveaway.......
Anyway, back on track :)
This year I looked at my enormously growing stash and realised I have more patterns and fabric than one little ole me needs for an entire lifetime and I felt overwhelmed. Sewing is more than my hobby, it is my passion and my outlet but I honestly spend more time trying to invent clever ways to store things than sewing - so it's time to make some changes. The other thing I did was I bought a pattern and then realised I already own that one....that was my final wake up call. If I don't know what I have, then I have too much. So this is where the New Years thing comes in........and if anyone is reading this, this is where you come in :)
The pattern I bought is the very cute Farbenmix Flora. It's new and unopened and I will post it anywhere. I do have a photo but I have sadly lost my card reader......so when that appears the photo will appear lol.
I will draw this giveaway (using some technical method like randomly picking from scrunched up names in a tupperware container) say........at the end of the month.
So to be in the draw please leave me a comment. You don't need to follow my blog or write a blog post about it, but if you want to spread the love then that's nice too.
Oh and the resolution thing! As I said I don't like them - so instead, this year I am going to 'aspire' to be more giving and this is my start :)